React Native 16 - 指南:屏幕导航(Navigating Between Screens)
Mobile apps are rarely made up of a single screen. Managing the presentation of, and transition between, multiple screens is typically handled by what is known as a navigator.
手机应用程序很少是单个屏幕。一般用导航器来管理多个屏幕的展示、切换。
This guide covers the various navigation components available in React Native. If you are just getting started with navigation, you will probably want to use React Navigation. React Navigation provides an easy to use navigation solution, with the ability to present common stack navigation and tabbed navigation patterns on both iOS and Android. As this is a JavaScript implementation, it provides the greatest amount of configurability as well as flexibility when integrating with state management libraries such as redux.
React Native中几种常用的导航在本文中都有介绍。如果是刚接触导航,通常使用React导航就能解决问题。React导航提供了一种简便的导航方案,包含iOS和Android上常见的堆栈和选项卡导航模式。这个组件是完全由JavaScript实现,与redux之类的状态管理库集成时,提供了良好的可配置性和可扩展性。
If you’re only targeting iOS, you may want to also check out NavigatorIOS as a way of providing a native look and feel with minimal configuration, as it provides a wrapper around the native UINavigationController class. This component will not work on Android, however.
如果目标平台只有iOS,可以选择使用NavigatorIOS,配置非常简单,同时实现了原生的视觉和操作体验。其封装了原生的UINavigationController类,所以这个组件也无法运行在Android平台上。
If you’d like to achieve a native look and feel on both iOS and Android, or you’re integrating React Native into an app that already manages navigation natively, the following libraries provide native navigation on both platforms: native-navigation, react-native-navigation.
如果需要同时在iOS和Android平台上获得良好的视觉和操作体验,或者将React集成在由原生导航管理的App中,可以考虑后面的跨平台原生导航:native-navigation,react-native-navigation。
React导航(React Navigation)
The community solution to navigation is a standalone library that allows developers to set up the screens of an app with just a few lines of code.
这是由社区提供的独立库解决方案,开发者只需要几行代码就可以设置好App的屏幕导航。
The first step is to install in your project:
首先需要将其安装到项目中:
npm install --save react-navigation
Then you can quickly create an app with a home screen and a profile screen:
接下来可以快速创建一个包含首页和概述两个屏幕视图页面的App:
import {
  StackNavigator,
} from 'react-navigation';

const App = StackNavigator({
  Home: { screen: HomeScreen },
  Profile: { screen: ProfileScreen },
});
Each screen component can set navigation options such as the header title. It can use action creators on the navigation prop to link to other screens:
每一个屏幕视图组件还可以设置头部标题等其他的配置选项。可以使用navigation(Action Creator)来链接到其他屏幕视图:
class HomeScreen extends React.Component {
  static navigationOptions = {
    title: 'Welcome',
  };
  render() {
    const { navigate } = this.props.navigation;
    return (
      <Button
        title="Go to Jane's profile"
        onPress={() =>
          navigate('Profile', { name: 'Jane' })
        }
      />
    );
  }
}
React Navigation routers make it easy to override navigation logic or integrate it into redux. Because routers can be nested inside each other, developers can override navigation logic for one area of the app without making widespread changes.
使用React导航路由可以非常简单的重新导航逻辑,也可以将其简单的集成到Redux中。由于路由器可以嵌套,开发者只需要改动少量的代码即可重写导航逻辑。
The views in React Navigation use native components and the Animated library to deliver 60fps animations that are run on the native thread. Plus, the animations and gestures can be easily customized.
React导航中使用的是原生组件和Animated库,运行在单独的本地线程中,以保证60帧的动画效果。另外,定制动画和手势非常简单。
For a complete intro to React Navigation, follow the React Navigation Getting Started Guide, or browse other docs such as the Intro to Navigators.
可以从React导航入门指南获取完整的信息,也可以在Navigators简介查看更多的文档信息。
NavigatorIOS
NavigatorIOS looks and feels just like UINavigationController, because it is actually built on top of it.
NavigatorIOS视觉和操作体验与UINavigationController完全一致,实际上前者是后者的封装。

<NavigatorIOS
  initialRoute={{
    component: MyScene,
    title: 'My Initial Scene',
    passProps: { myProp: 'foo' },
  }}
/>
Like other navigation systems, NavigatorIOS uses routes to represent screens, with some important differences. The actual component that will be rendered can be specified using the component key in the route, and any props that should be passed to this component can be specified in passProps. A “navigator” object is automatically passed as a prop to the component, allowing you to call push and pop as needed.
跟其他导航梓潼类似,NavigatorIOS也使用路由来定义屏幕视图,但也存在一些不一样的地方。路由中定义的component组件是实际上被渲染的组件,在passProps中定义的任何特性都会被传递到该组件。navigator对象自动的传递到组件的特性中,方便在组件中调用push和pop方法。
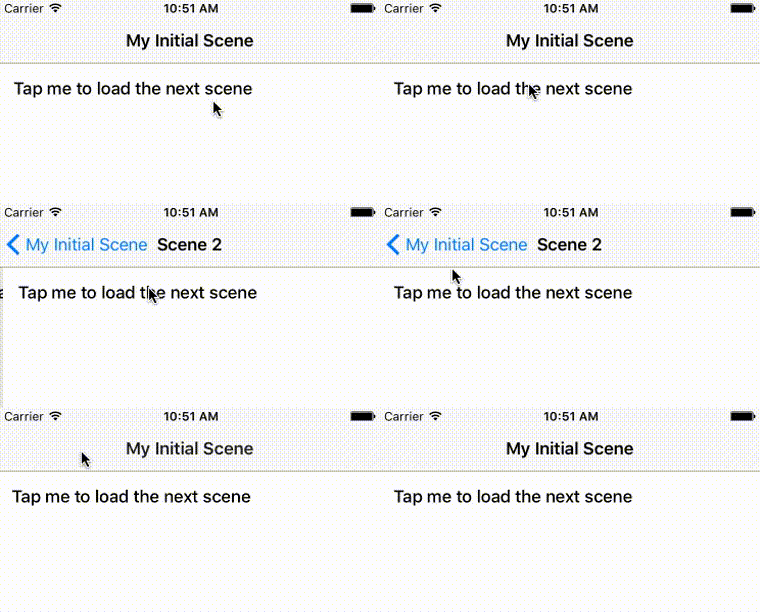
As NavigatorIOS leverages native UIKit navigation, it will automatically render a navigation bar with a back button and title.
由于NavigatorIOS使用的是原生的UIKit导航,其会自动渲染一个包含标题和返回键的导航条。
import React from 'react';
import PropTypes from 'prop-types';
import { Button, NavigatorIOS, Text, View } from 'react-native';

export default class NavigatorIOSApp extends React.Component {
  render() {
    return (
      <NavigatorIOS
        initialRoute={{
          component: MyScene,
          title: 'My Initial Scene',
        }}
        style={{flex: 1}}
      />
    )
  }
}

class MyScene extends React.Component {
  static propTypes = {
    title: PropTypes.string.isRequired,
    navigator: PropTypes.object.isRequired,
  }

  constructor(props, context) {
    super(props, context);
    this._onForward = this._onForward.bind(this);
  }

  _onForward() {
    this.props.navigator.push({
      title: 'Scene ' + nextIndex,
    });
  }

  render() {
    return (
      <View>
        <Text>Current Scene: { this.props.title }</Text>
        <Button
          onPress={this._onForward}
          title="Tap me to load the next scene"
        />
      </View>
    )
  }
}
Check out the NavigatorIOS reference docs to learn more about this component.
打开NavigatorIOS参考文档查看更多组件相关信息。