React 24 - 性能优化(Optimizing Performance)
Internally, React uses several clever techniques to minimize the number of costly DOM operations required to update the UI. For many applications, using React will lead to a fast user interface without doing much work to specifically optimize for performance. Nevertheless, there are several ways you can speed up your React application.
React内部在UI更新时采用了一些聪明的技术策略来减少昂贵的DOM操作次数。大多数应用中,并不需要过多性能优化就能实现一个高性能的用户界面。虽然如此,还是有一些方法可以提高应用程序的运行速度。
使用生产环境构建版本(Use the Production Build)
If you’re benchmarking or experiencing performance problems in your React apps, make sure you’re testing with the minified production build.
在进行React应用程序的基准测试之前,或者当存在性能体验问题的时候,确保正在使用的代码是压缩后的生产环境构建版本。
By default, React includes many helpful warnings. These warnings are very useful in development. However, they make React larger and slower so you should make sure to use the production version when you deploy the app.
默认情况下,React包含了很多有用的警告提示。这些提示信息对开发非常有帮助,但造成的副作用是使React应用程序更大更慢,所以当发布应用程序的时候必须确保使用的生产环境版本。
If you aren’t sure whether your build process is set up correctly, you can check it by installing React Developer Tools for Chrome. If you visit a site with React in production mode, the icon will have a dark background:
如果不确定构建过程的设置是否正确,可以安装React Developer Tools for Chrome进行检查。如果访问的站点使用的是React生产模式构建版本,这个插件的ICON是黑色背景:

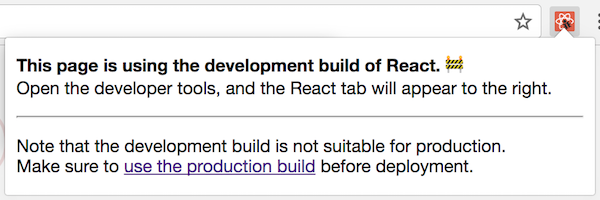
If you visit a site with React in development mode, the icon will have a red background:
如果使用的是开发模式构建版本,ICON对应的是红色背景:

It is expected that you use the development mode when working on your app, and the production mode when deploying your app to the users.
开发的时候使用开发模式构建,发布到生产环境的时候使用生产模式构建。
You can find instructions for building your app for production below.
下面会介绍一些常见的生产环境构建方式。
Create React App
If your project is built with Create React App, run:
如果你的项目是用Create React App创建的,执行:
npm run build
This will create a production build of your app in the build/ folder of your project.
这样会在项目的/build目录中生成一个生产环境版本。
Remember that this is only necessary before deploying to production. For normal development, use npm start.
这个命令只有需要发布到生产环境的时候才需要使用。通常开发的情况下,使用npm start命令。
单独文件引用(Single-File Builds)
We offer production-ready versions of React and React DOM as single files:
React和React DOM提供了生产环境版本的单独文件:
<script src="https://unpkg.com/react@15/dist/react.min.js"></script>
<script src="https://unpkg.com/react-dom@15/dist/react-dom.min.js"></script>
Remember that only React files ending with .min.js are suitable for production.
切记在生产环境中使用.min.js后缀版本的React文件。
Brunch
For the most efficient Brunch production build, install the uglify-js-brunch plugin:
对于大多数的Brunch生产环境构建,需要安装uglify-js-brunch插件:
# If you use npm
npm install --save-dev uglify-js-brunch

# If you use Yarn
yarn add --dev uglify-js-brunch
Then, to create a production build, add the -p flag to the build command:
然后执行build命令时添加-p参数即可创建生产环境版本:
brunch build -p
Remember that you only need to do this for production builds. You shouldn’t pass -p flag or apply this plugin in development because it will hide useful React warnings, and make the builds much slower.
切记只需要在生产环境版本的构建中使用上述设置,在开发环境中千万不要添加-p参数,否则将隐藏掉有用的React警告信息,也会导致构建变慢。
Browserify
For the most efficient Browserify production build, install a few plugins:
对于大多数的Browserify生产环境构建,需要安装下列插件:
# If you use npm
npm install --save-dev bundle-collapser envify uglify-js uglifyify

# If you use Yarn
yarn add --dev bundle-collapser envify uglify-js uglifyify
To create a production build, make sure that you add these transforms (the order matters):
- The
envifytransform ensures the right build environment is set. Make it global (-g). - The
uglifyifytransform removes development imports. Make it global too (-g). - The
bundle-collapserplugin replaces long module IDs with numbers. - Finally, the resulting bundle is piped to
uglify-jsfor mangling (read why).
For example:
为了构建正确的生产环境版本,需要确保上述添加的插件按顺序正确执行:
envify插件用来设置正确的构建环境变量,需要加上全局参数(-g)。uglifyify插件用来移除开发环境引用的资源,也需要加上全局参数(-g)。bundle-collapser插件将长模块ID用较短的数字替换。- 最后,将上面3步的结果通过管道操作符传递给
uglify-js压缩(为什么?)。
如下所示:
browserify ./index.js \
  -g [ envify --NODE_ENV production ] \
  -g uglifyify \
  -p bundle-collapser/plugin \
  | uglifyjs --compress --mangle > ./bundle.js
提醒(Note):
The package name is
uglify-js, but the binary it provides is calleduglifyjs.
This is not a typo.包名是
uglify-js,二进制执行文件需要用uglifyjs调用。
注意不要打错字。
Remember that you only need to do this for production builds. You shouldn’t apply these plugins in development because they will hide useful React warnings, and make the builds much slower.
切记只需要在生产环境版本的构建中使用上述设置,在开发环境中千万不要使用上述插件,否则将隐藏掉有用的React警告信息,也会导致构建变慢。
Rollup
For the most efficient Rollup production build, install a few plugins:
对于大多数Rollup生产环境构建,需要安装下列插件:
# If you use npm
npm install --save-dev rollup-plugin-commonjs rollup-plugin-replace rollup-plugin-uglify

# If you use Yarn
yarn add --dev rollup-plugin-commonjs rollup-plugin-replace rollup-plugin-uglify
To create a production build, make sure that you add these plugins (the order matters):
- The
replaceplugin ensures the right build environment is set. - The
commonjsplugin provides support for CommonJS in Rollup. - The
uglifyplugin compresses and mangles the final bundle.
为了构建正确的生产环境版本,需要确保上述添加的插件按顺序正确执行:
plugins: [
  // ...
  require('rollup-plugin-replace')({
    'process.env.NODE_ENV': JSON.stringify('production')
  }),
  require('rollup-plugin-commonjs')(),
  require('rollup-plugin-uglify')(),
  // ...
]
For a complete setup example see this gist.
详细示例参考此Gist.
Remember that you only need to do this for production builds. You shouldn’t apply the uglify plugin or the replace plugin with 'production' value in development because they will hide useful React warnings, and make the builds much slower.
切记只需要在生产环境版本的构建中使用上述设置,在开发环境中千万不要使用uglify插件,也不能给replace设置production参数值,否则将隐藏掉有用的React警告信息,也会导致构建变慢。
webpack
提醒(Note):
If you’re using Create React App, please follow the instructions above.
This section is only relevant if you configure webpack directly.如果现在使用的是Create React App,请参考上面的指南。
下面的内容跟直接使用webpack配置相关。
For the most efficient webpack production build, make sure to include these plugins in your production configuration:
对于大多数webpack生产环境构建,确保在生产环境版本配置文件中包含了下列插件:
new webpack.DefinePlugin({
  'process.env': {
    NODE_ENV: JSON.stringify('production')
  }
}),
new webpack.optimize.UglifyJsPlugin()
You can learn more about this in webpack documentation.
可以从webpack文档学习更多细节。
Remember that you only need to do this for production builds. You shouldn’t apply UglifyJsPlugin or DefinePlugin with 'production' value in development because they will hide useful React warnings, and make the builds much slower.
切记只需要在生产环境版本的构建中使用上述设置,在开发环境中千万不要使用UglifyJsPlugin,也不能给DefinedPlugin设置'production'值,否则将隐藏掉有用的React警告信息,也会导致构建变慢。
使用Chrome性能选项卡分析组件(Profiling Components with the Chrome Performance Tab)
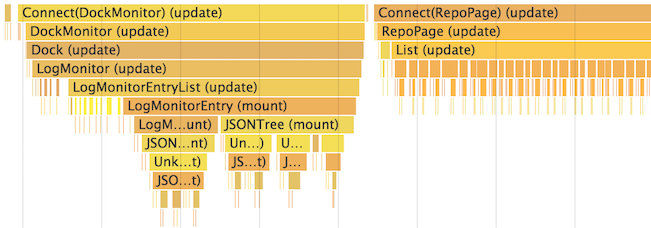
In the development mode, you can visualize how components mount, update, and unmount, using the performance tools in supported browsers. For example:
在开发模式下,可以使用支持性能分析工具的浏览器将组件的加载,更新和卸载可视化分析。如下所示:

To do this in Chrome:
-
Load your app with
?react_perfin the query string (for example,http://localhost:3000/?react_perf). -
Open the Chrome DevTools Performance tab and press Record.
-
Perform the actions you want to profile. Don’t record more than 20 seconds or Chrome might hang.
-
Stop recording.
-
React events will be grouped under the User Timing label.
在Chrome浏览器中可以按如下步骤操作:
-
在URL中添加
?react_perf启动应用程序(比如,http://localhost:3000/?react_perf)。 -
打开Chrome开发者工具,选择Performance选项卡,点击Record按钮。
-
在应用程序中执行需要分析的操作。注意记录时间不要超过20秒,否则Chrome有可能崩溃。
-
停止记录。
-
在User Timing标签分组中查看React产生的相关事件。
Note that the numbers are relative so components will render faster in production. Still, this should help you realize when unrelated UI gets updated by mistake, and how deep and how often your UI updates occur.
注意上述测试的数字是相对的,组件在生产环境中渲染将会更快。但是,这个测试结果依然可以帮助你找到错误导致不相关的UI更新,UI更新发生的深度和频次等细节问题。
Currently Chrome, Edge, and IE are the only browsers supporting this feature, but we use the standard User Timing API so we expect more browsers to add support for it.
上述统计使用的是User Timing API,期望更多的浏览器支持这个API。目前只有Chrome,Edge和IE支持这个特性。
避免子级校正(Avoid Reconciliation)
React builds and maintains an internal representation of the rendered UI. It includes the React elements you return from your components. This representation lets React avoid creating DOM nodes and accessing existing ones beyond necessity, as that can be slower than operations on JavaScript objects. Sometimes it is referred to as a “virtual DOM”, but it works the same way on React Native.
React会创建并维护一个UI渲染的内部表示,包含从组件中返回的React元素。这样可以用JavaScript对象替代昂贵的创建和访问DOM节点。
When a component’s props or state change, React decides whether an actual DOM update is necessary by comparing the newly returned element with the previously rendered one. When they are not equal, React will update the DOM.
当组件的Props或State发生变化时,React通过对比新旧两个内部渲染表示的差异来决定是否需要更新真实DOM。当两者存在差异的时候,React会进行DOM的更新。
In some cases, your component can speed all of this up by overriding the lifecycle function shouldComponentUpdate, which is triggered before the re-rendering process starts. The default implementation of this function returns true, leaving React to perform the update:
在某些情况下,可以通过覆盖组件的shouldComponentUpdate生命周期方法——每次重新渲染开始时会触发,来加快上面的过程。该方法默认返回true,指示React执行更新:
shouldComponentUpdate(nextProps, nextState) {
  return true;
}
If you know that in some situations your component doesn’t need to update, you can return false from shouldComponentUpdate instead, to skip the whole rendering process, including calling render() on this component and below.
在某些情况下,如果你的组件明确不需要更新,可以在shouldComponentUpdate中返回false来中止该组件及其子组件调用render()方法。
shouldComponentUpdate用法(shouldComponentUpdate In Action)
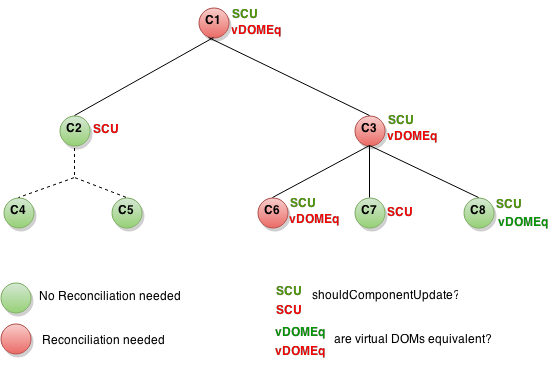
Here’s a subtree of components. For each one, SCU indicates what shouldComponentUpdate returned, and vDOMEq indicates whether the rendered React elements were equivalent. Finally, the circle’s color indicates whether the component had to be reconciled or not.
下图的组件树中,SCU表示shouldComponentUpdate的返回值,vDOMEq表示渲染的React元素是否跟之前相同,圆圈的颜色表示组件是否需要更新对应的DOM。

Since shouldComponentUpdate returned false for the subtree rooted at C2, React did not attempt to render C2, and thus didn’t even have to invoke shouldComponentUpdate on C4 and C5.
由于C2节点的shouldComponentUpdate的返回值是false,所以React不会尝试对C2进行更新,也不会调用C4和C5的shouldComponentUpdate方法。
For C1 and C3, shouldComponentUpdate returned true, so React had to go down to the leaves and check them. For C6 shouldComponentUpdate returned true, and since the rendered elements weren’t equivalent React had to update the DOM.
对于C1和C3,shouldComponentUpdate方法返回值是true,所以React必须检查它们的叶子节点。由于C6的shouldComponentUpdate返回值是true,并且其渲染结果跟之前不相同,所以必须更新对应的DOM。
The last interesting case is C8. React had to render this component, but since the React elements it returned were equal to the previously rendered ones, it didn’t have to update the DOM.
最有趣的是C8节点,React必须对其进行渲染,但其返回的渲染结果跟之前渲染结果相同,所以不必更新DOM。
Note that React only had to do DOM mutations for C6, which was inevitable. For C8, it bailed out by comparing the rendered React elements, and for C2’s subtree and C7, it didn’t even have to compare the elements as we bailed out on shouldComponentUpdate, and render was not called.
最终结果是React只需要更新C6对应的DOM。对于C8,由于渲染结果和之前渲染结果相同,跳过DOM更新;对于C2的子树和C7,没有必要对比渲染结果,shouldComponentUpdate返回false,已经跳过了render方法的调用。
示例(Examples)
If the only way your component ever changes is when the props.color or the state.count variable changes, you could have shouldComponentUpdate check that:
如果跟组件更新相关的变量只有props.color和state.count,可以在shouldComponentUpdate中做如下检查:
class CounterButton extends React.Component {
  constructor(props) {
    super(props);
    this.state = {count: 1};
  }

  shouldComponentUpdate(nextProps, nextState) {
    if (this.props.color !== nextProps.color) {
      return true;
    }
    if (this.state.count !== nextState.count) {
      return true;
    }
    return false;
  }

  render() {
    return (
      <button
        color={this.props.color}
        onClick={() => this.setState(state => ({count: state.count + 1}))}>
        Count: {this.state.count}
      </button>
    );
  }
}
In this code, shouldComponentUpdate is just checking if there is any change in props.color or state.count. If those values don’t change, the component doesn’t update. If your component got more complex, you could use a similar pattern of doing a “shallow comparison” between all the fields of props and state to determine if the component should update. This pattern is common enough that React provides a helper to use this logic - just inherit from React.PureComponent. So this code is a simpler way to achieve the same thing:
在这份代码中,shouldComponentUpdate只是检查了props.color或者state.count的变化。如果这两个值没有发生变化,组件就不会进行更新。当组件更复杂的时候,可以使用一个相似的模式——对props和state进行“浅对比”来决定是否需要对组件进行更新。React提供了一个帮助类来简化这个逻辑——只需要继承自React.PureComponent组件即可,用这个类更改后下面的代码和上面代码功能一致:
class CounterButton extends React.PureComponent {
  constructor(props) {
    super(props);
    this.state = {count: 1};
  }

  render() {
    return (
      <button
        color={this.props.color}
        onClick={() => this.setState(state => ({count: state.count + 1}))}>
        Count: {this.state.count}
      </button>
    );
  }
}
Most of the time, you can use React.PureComponent instead of writing your own shouldComponentUpdate. It only does a shallow comparison, so you can’t use it if the props or state may have been mutated in a way that a shallow comparison would miss.
大多数情况下,可以使用React.PureComponent替代手写shouldComponentUpdate方法。由于进行的是浅比较,需要注意的是当props或state的数据被修改后不会触发更新。
This can be a problem with more complex data structures. For example, let’s say you want a ListOfWords component to render a comma-separated list of words, with a parent WordAdder component that lets you click a button to add a word to the list. This code does not work correctly:
在复杂的案例中会导致一些问题。比如,假如在ListOfWords组件中需要渲染一个逗号分隔符列表,其父组件WordAdder组件会在点击按钮时添加一个新词到列表中。那么下面的代码不会正确工作:
class ListOfWords extends React.PureComponent {
  render() {
    return <div>{this.props.words.join(',')}</div>;
  }
}

class WordAdder extends React.Component {
  constructor(props) {
    super(props);
    this.state = {
      words: ['marklar']
    };
    this.handleClick = this.handleClick.bind(this);
  }

  handleClick() {
    // This section is bad style and causes a bug
    const words = this.state.words;
    words.push('marklar');
    this.setState({words: words});
  }

  render() {
    return (
      <div>
        <button onClick={this.handleClick} />
        <ListOfWords words={this.state.words} />
      </div>
    );
  }
}
The problem is that PureComponent will do a simple comparison between the old and new values of this.props.words. Since this code mutates the words array in the handleClick method of WordAdder, the old and new values of this.props.words will compare as equal, even though the actual words in the array have changed. The ListOfWords will thus not update even though it has new words that should be rendered.
问题的原因是PureComponent组件只会在this.props.words新旧两个值之间简单的进行浅比较。当WordAdder组件中的handleClick方法更改了words数组,this.props.words新旧两个值之间是相等的,虽然数组中的单词已经被实际更改了。所以即使有了新的单词加入后,ListOfWords也不会进行更新。
不可变数据结构的力量(The Power Of Not Mutating Data)
The simplest way to avoid this problem is to avoid mutating values that you are using as props or state. For example, the handleClick method above could be rewritten using concat as:
最简单的避免上述问题的方法是避免修改props和state中的值。比如将上面的handleClick方法中使用concat重写如下:
handleClick() {
  this.setState(prevState => ({
    words: prevState.words.concat(['marklar'])
  }));
}
ES6 supports a spread syntax for arrays which can make this easier. If you’re using Create React App, this syntax is available by default.
ES6支持在数组中使用展开操作符语法简化这个操作。如果使用的是Create React App创建的项目,默认可以直接使用这个语法。
handleClick() {
  this.setState(prevState => ({
    words: [...prevState.words, 'marklar'],
  }));
};
You can also rewrite code that mutates objects to avoid mutation, in a similar way. For example, let’s say we have an object named colormap and we want to write a function that changes colormap.right to be 'blue'. We could write:
也可以用相同的方式在对象操作中避免对象修改。比如,假如有一个叫做colormap的对象,在一个方法内部将其colormap.right赋值为'blue'。可以这样写:
function updateColorMap(colormap) {
  colormap.right = 'blue';
}
To write this without mutating the original object, we can use Object.assign method:
可以用Object.assign方法避免修改原对象:
function updateColorMap(colormap) {
  return Object.assign({}, colormap, {right: 'blue'});
}
updateColorMap now returns a new object, rather than mutating the old one. Object.assign is in ES6 and requires a polyfill.
现在updateColormap方法将返回一个新对象,原对象不会被修改。Object.assign是ES6中的方法,在项目中需要一个垫片。
There is a JavaScript proposal to add object spread properties to make it easier to update objects without mutation as well:
有一个对象属性展开操作JavaScript提议可以简化上面更新对象的过程:
function updateColorMap(colormap) {
  return {...colormap, right: 'blue'};
}
If you’re using Create React App, both Object.assign and the object spread syntax are available by default.
如果使用的是Create React App创建的项目,Object.assign和对象展开语法也是默认可以直接使用的。
使用不可变数据结构(Using Immutable Data Structures)
Immutable.js is another way to solve this problem. It provides immutable, persistent collections that work via structural sharing:
- Immutable: once created, a collection cannot be altered at another point in time.
- Persistent: new collections can be created from a previous collection and a mutation such as set. The original collection is still valid after the new collection is created.
- Structural Sharing: new collections are created using as much of the same structure as the original collection as possible, reducing copying to a minimum to improve performance.
Immutable.js是另外一种解决上面这个问题的方案,其通过共享数据结构提供不可变,持久化的集合。
- Immutable:一经创建,就永远不会被修改。
- Persistent:基于之前的集合创建新集合,原来的集合依然可用。
- 结构共享:新集合和旧集合的结构尽可能相同,尽可能提高性能。
Immutability makes tracking changes cheap. A change will always result in a new object so we only need to check if the reference to the object has changed. For example, in this regular JavaScript code:
不可变数据类型实现了高效的修改追踪。修改总是会创建一个新对象,只需要检查对象的引用即知其实否发生了变化。比如,常见的JavaScript代码如下:
const x = { foo: 'bar' };
const y = x;
y.foo = 'baz';
x === y; // true
Although y was edited, since it’s a reference to the same object as x, this comparison returns true. You can write similar code with immutable.js:
虽然y被修改了,由于和x的引用相同,两者的比较结果是true。使用immutable.js重写如下:
const SomeRecord = Immutable.Record({ foo: null });
const x = new SomeRecord({ foo: 'bar' });
const y = x.set('foo', 'baz');
x === y; // false
In this case, since a new reference is returned when mutating x, we can safely assume that x has changed.
在这个案例中,x修改后会返回一个新的引用,可以安全的判断x已经发生了变化。
Two other libraries that can help use immutable data are seamless-immutable and immutability-helper.
另外两种实现不可变数据类型的库是seamless-immutable和immutability-helper。
Immutable data structures provide you with a cheap way to track changes on objects, which is all we need to implement shouldComponentUpdate. This can often provide you with a nice performance boost.
不可变数据类型提供了一个简单高效的方式来检查对象的变化,基于此实现shouldComponentUpdate,可以获得一个良好的性能提升。