React 13 - React编程思想(Thinking in React)
React is, in our opinion, the premier way to build big, fast Web apps with JavaScript. It has scaled very well for us at Facebook and Instagram.
在我们看来,React是JavaScript构建大型,高性能Web应用的首选。在Facebook和Instagram已经大规模的顺利使用。
One of the many great parts of React is how it makes you think about apps as you build them. In this document, we’ll walk you through the thought process of building a searchable product data table using React.
使用React的一个重要部分是要思考应用是如何构建起来的。在这份文档中,将向你展示用React构建一个搜索产品数据表应用逐步思考的过程。
从Mock开始(Start With A Mock)
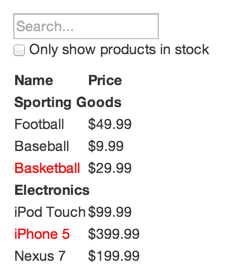
Imagine that we already have a JSON API and a mock from our designer. The mock looks like this:
假设已经有了一个JSON API和一个设计稿。设计稿如下所示:

Our JSON API returns some data that looks like this:
API返回的JSON数据如下所示:
[
  {category: "Sporting Goods", price: "$49.99", stocked: true, name: "Football"},
  {category: "Sporting Goods", price: "$9.99", stocked: true, name: "Baseball"},
  {category: "Sporting Goods", price: "$29.99", stocked: false, name: "Basketball"},
  {category: "Electronics", price: "$99.99", stocked: true, name: "iPod Touch"},
  {category: "Electronics", price: "$399.99", stocked: false, name: "iPhone 5"},
  {category: "Electronics", price: "$199.99", stocked: true, name: "Nexus 7"}
];
第一步:拆解UI为组件层次结构(Step 1: Break The UI Into A Component Hierarchy)
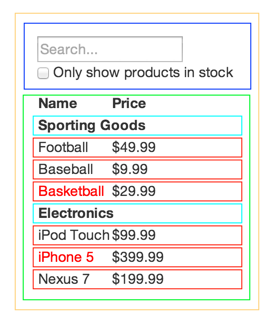
The first thing you’ll want to do is to draw boxes around every component (and subcomponent) in the mock and give them all names. If you’re working with a designer, they may have already done this, so go talk to them! Their Photoshop layer names may end up being the names of your React components!
首先在UI稿中描边区分各个组件(和子组件)并对所有组件命名。如果和设计师一起工作,他们可能已经完成了这个工作,去和他们聊一下问问!他们交付的Photoshop层的名字可能是你的React组件的一个良好命名。
But how do you know what should be its own component? Just use the same techniques for deciding if you should create a new function or object. One such technique is the single responsibility principle, that is, a component should ideally only do one thing. If it ends up growing, it should be decomposed into smaller subcomponents.
但是该如何拆分组件呢?其实只需要像拆分一个新方法或新对象一样的方式即可。一个常用的技术是单一职责原则,即一个组件理想情况下只处理一件事。如果一个组件持续膨胀,就应该将其拆分为多个更小的组件中。
Since you’re often displaying a JSON data model to a user, you’ll find that if your model was built correctly, your UI (and therefore your component structure) will map nicely. That’s because UI and data models tend to adhere to the same information architecture, which means the work of separating your UI into components is often trivial. Just break it up into components that represent exactly one piece of your data model.
一直以来会把JSON数据模型展现给最终用户,你应该发现如果模型构建正确,则对应的UI(以及组件结构)会完美映射。毕竟无论UI还是数据模型表现的是同一个信息架构,这意味将UI拆分成组件的工作通常比较琐碎,只需要将其拆分为精确对应数据模型的片段即可。

You’ll see here that we have five components in our simple app. We’ve italicized the data each component represents.
FilterableProductTable(orange): contains the entirety of the exampleSearchBar(blue): receives all user inputProductTable(green): displays and filters the data collection based on user inputProductCategoryRow(turquoise): displays a heading for each categoryProductRow(red): displays a row for each product
可以看到在这个简单的小应用中拆分了如下5个组件,并将每个组件代表的数据用斜体标注。
FilterableProductTable(橙色):包含整个示例程序SearchBar(蓝色):接收所有的用户输入ProductTable(绿色):基于用户输入显示和过滤数据集合ProductCategoryRow(宝石蓝):显示每个类别的行标题ProductRow(红色):显示每个产品的行数据
If you look at ProductTable, you’ll see that the table header (containing the “Name” and “Price” labels) isn’t its own component. This is a matter of preference, and there’s an argument to be made either way. For this example, we left it as part of ProductTable because it is part of rendering the data collection which is ProductTable’s responsibility. However, if this header grows to be complex (i.e. if we were to add affordances for sorting), it would certainly make sense to make this its own ProductTableHeader component.
仔细观察ProductTable将会发现表头(包含“Name”和“Price”标签)不是自身的组件。这是个人偏好而已,当然也存在用其他方式实现的争论。在这个例子中,将其作为ProductTable的一部分来处理,因为它是数据集合渲染的一部分,是ProductTable的职责。当然,如果这个表头变得复杂起来时(比如,如果需要添加排序功能),这时候创建一个ProductTableHeader组件更合适。
Now that we’ve identified the components in our mock, let’s arrange them into a hierarchy. This is easy. Components that appear within another component in the mock should appear as a child in the hierarchy:
此时各个组件已经在UI中标注出来,让我们将其组织到一个层次结构中。这是比较简单的,组件中包含的组件在层次结构中作为其子组件即可:
FilterableProductTableSearchBarProductTableProductCategoryRowProductRow
第二步:构建React静态版本(Step 2: Build A Static Version in React)
See the Pen Thinking In React: Step 2 on CodePen.
Now that you have your component hierarchy, it’s time to implement your app. The easiest way is to build a version that takes your data model and renders the UI but has no interactivity. It’s best to decouple these processes because building a static version requires a lot of typing and no thinking, and adding interactivity requires a lot of thinking and not a lot of typing. We’ll see why.
目前为止我们已经完成了组件层次,是时候实现应用了。首先实现一个最简单的根据数据模型渲染UI的静态版本,稍后再实现包含交互的动态版本。将这两个实现过程分开是比较好的实践方式,因为实现静态版本需要敲大量的代码和少量的思考,而添加交互则需要大量的思考和敲少量的代码。下面看看这是为什么。
To build a static version of your app that renders your data model, you’ll want to build components that reuse other components and pass data using props. props are a way of passing data from parent to child. If you’re familiar with the concept of state, don’t use state at all to build this static version. State is reserved only for interactivity, that is, data that changes over time. Since this is a static version of the app, you don’t need it.
构建渲染数据模型的静态版本应用,应该使用可重用的组件并通过属性传递数据。属性将数据从父级组件传递到子级。如果熟悉状态的概念,在这个静态版本应用中千万不要使用状态。状态仅用做应用的交互功能实现,也就是说,随着时间会发生变化的数据。但在这个静态版本应用中不需要使用它。
You can build top-down or bottom-up. That is, you can either start with building the components higher up in the hierarchy (i.e. starting with FilterableProductTable) or with the ones lower in it (ProductRow). In simpler examples, it’s usually easier to go top-down, and on larger projects, it’s easier to go bottom-up and write tests as you build.
静态版本应用可以自上至下构建,也可以自下至上构建。就是说,即可以从组件层次的顶端的组件(比如FilterableProductTable)开始,也可以从一个底层组件(比如ProductRow)开始,通常自上至下的构建方式更简单一些,但在大型项目中,自下至上的构建并同步编写测试用例更容易一些。
At the end of this step, you’ll have a library of reusable components that render your data model. The components will only have render() methods since this is a static version of your app. The component at the top of the hierarchy (FilterableProductTable) will take your data model as a prop. If you make a change to your underlying data model and call ReactDOM.render() again, the UI will be updated. It’s easy to see how your UI is updated and where to make changes since there’s nothing complicated going on. React’s one-way data flow (also called one-way binding) keeps everything modular and fast.
这个步骤的最后,应该已经积累出一个可重用的组件库,以用来渲染数据模型。目前为止,静态版本应用的组件中应该仅仅包含render()方法。最顶层的组件(FilterableProductTable)属性中应该接收数据模型。当改变底层数据模型并调用ReactDOM.render()方法后,UI将同步更新。这有利于观测UI的更新以及相关的数据变化,因为这中间没有做什么复杂的事情。React中的单向数据流(也叫做单向绑定)使项目能保持模块化和高性能。
Simply refer to the React docs if you need help executing this step.
这步骤的执行中如果需要可以从React文档中查找相关资料。
小插曲:对比属性和状态(A Brief Interlude: Props vs State)
There are two types of “model” data in React: props and state. It’s important to understand the distinction between the two; skim the official React docs if you aren’t sure what the difference is.
在React中有两种类型的“模型”数据:属性和状态。理解这两者的差异非常重要;如果理解的还不充分可以参阅官方React文档。
第3步:标识UI状态的最小(但完整)表示(Step 3: Identify The Minimal (but complete) Representation Of UI State)
To make your UI interactive, you need to be able to trigger changes to your underlying data model. React makes this easy with state.
添加UI的交互行为,需要触发应用底层数据模型的更新。React中使用状态来简化实现。
To build your app correctly, you first need to think of the minimal set of mutable state that your app needs. The key here is DRY: Don’t Repeat Yourself. Figure out the absolute minimal representation of the state your application needs and compute everything else you need on-demand. For example, if you’re building a TODO list, just keep an array of the TODO items around; don’t keep a separate state variable for the count. Instead, when you want to render the TODO count, simply take the length of the TODO items array.
正确的实现这一步,第一件事是思考应用所需要可变状态的最小集合。这件事的关键是DRY:不要自我重复。刨析应用中所需要的绝对最小集合的状态表示,并且其他所需的数据都可以据此计算出来。比如,如果要创建一个TODO列表,只保留一个TODO元素数组即可;不需要为元素数量保留一个单独的状态变量。当需要渲染TODO数量的时候,直接获取TODO数组的长度即可。
Think of all of the pieces of data in our example application. We have:
- The original list of products
- The search text the user has entered
- The value of the checkbox
- The filtered list of products
思考本示例应用中所有的数据。应用有:
- 原始产品列表
- 用户输入的搜索文本
- 复选框的值
- 过滤后的产品列表
Let’s go through each one and figure out which one is state. Simply ask three questions about each piece of data:
- Is it passed in from a parent via props? If so, it probably isn’t state.
- Does it remain unchanged over time? If so, it probably isn’t state.
- Can you compute it based on any other state or props in your component? If so, it isn’t state.
仔细分析每一个数据,弄清楚哪一个是状态。简单的使用下面3个问题匹配每一个数据:
- 该数据是否是由其父级属性传入的?如果是,则它可能不是状态。
- 该数据是否永远不会发生变化?如果是,则它可能不是状态。
- 该数据是否可以由其他状态或属性计算得出?如果是,则它不是状态。
The original list of products is passed in as props, so that’s not state. The search text and the checkbox seem to be state since they change over time and can’t be computed from anything. And finally, the filtered list of products isn’t state because it can be computed by combining the original list of products with the search text and value of the checkbox.
So finally, our state is:
- The search text the user has entered
- The value of the checkbox
原始产品列表是由属性传入的,所以不是状态。搜索文本和复选框看着像状态,两者会根据用户的输入发生变化并且不能从其他数据计算得出。最后,过滤后的产品列表可以根据搜索文本和复选框的状态对原始产品列表计算得出,它也不是状态。
- 用户输入的搜索文本
- 复选框的值
第四步:标识需要更改的状态(Step 4: Identify Where Your State Should Live)
See the Pen Thinking In React: Step 4 by Kevin Lacker (@lacker) on CodePen.
OK, so we’ve identified what the minimal set of app state is. Next, we need to identify which component mutates, or owns, this state.
现在,已经标记出了应用所需的状态最小集合。接下来,需要确定是哪个组件可变,或者哪个组件拥有这些状态。
Remember: React is all about one-way data flow down the component hierarchy. It may not be immediately clear which component should own what state. This is often the most challenging part for newcomers to understand, so follow these steps to figure it out:
切记:React中整个相关的单向数据流向下贯穿组件层次。有可能不能立即判断出状态属于哪个组件。这常常是新手最难理解的一部分,试着按下面的步骤分析操作:
For each piece of state in your application:
- Identify every component that renders something based on that state.
- Find a common owner component (a single component above all the components that need the state in the hierarchy).
- Either the common owner or another component higher up in the hierarchy should own the state.
- If you can’t find a component where it makes sense to own the state, create a new component simply for holding the state and add it somewhere in the hierarchy above the common owner component.
对于应用中的每一个状态:
- 标识出涉及该状态渲染的组件。
- 找出公共父级组件(在组件层次中包含所有需要该状态的组件的父级组件)。
- 此公共父级组件或祖先组件拥有该状态。
- 如果不能找到一个拥有该状态的合适组件,可以创建一个新的组件用来保持该状态,将其添加到公共父级组件的上层即可。
Let’s run through this strategy for our application:
ProductTableneeds to filter the product list based on state andSearchBarneeds to display the search text and checked state.- The common owner component is
FilterableProductTable. - It conceptually makes sense for the filter text and checked value to live in
FilterableProductTable
在应用中运用一下这个策略:
ProductTable依赖于上述状态过滤产品列表,SearchBar依赖于这些状态显示搜索文本和复选框状态。- 公共的父级组件是
FilterableProductTable。 - 从概念上讲
FilterableProductTable拥有搜索文本和复选框状态是合理的。
Cool, so we’ve decided that our state lives in FilterableProductTable. First, add an instance property this.state = {filterText: '', inStockOnly: false} to FilterableProductTable’s constructor to reflect the initial state of your application. Then, pass filterText and inStockOnly to ProductTable and SearchBar as a prop. Finally, use these props to filter the rows in ProductTable and set the values of the form fields in SearchBar.
现在已经决定将状态放置在FilterableProductTable中。首先在FilterableProductTable的构造函数中添加一个实例属性this.state = {filterText: '', inStockOnly: false},作为应用的初始状态。然后,将filterText和inStockOnly作为ProductTable和SearchBar的属性传入。最终,实现在ProductTable中通过这些属性过滤行和在SearchBar中设置表单字段值。
You can start seeing how your application will behave: set filterText to "ball" and refresh your app. You’ll see that the data table is updated correctly.
可以试试应用现在的表现:将filterText设置为"ball"后刷新应用。会看到数据表格将正确更新。
第五步:添加反向数据流(Step 5: Add Inverse Data Flow)
See the Pen Thinking In React: Step 5 on CodePen.
So far, we’ve built an app that renders correctly as a function of props and state flowing down the hierarchy. Now it’s time to support data flowing the other way: the form components deep in the hierarchy need to update the state in FilterableProductTable.
目前为止,构建的应用已经具备了正确渲染属性和状态沿着层次结构向下传播的功能。接下来要实现数据流传播的另一个方向:层次结构深层的表单组件需要更新FilterableProductTable中的状态。
React makes this data flow explicit to make it easy to understand how your program works, but it does require a little more typing than traditional two-way data binding.
React中明确的数据流向使得理解应用的工作逻辑很容易,但实现传统的数据双向绑定需要多敲一些代码。
If you try to type or check the box in the current version of the example, you’ll see that React ignores your input. This is intentional, as we’ve set the value prop of the input to always be equal to the state passed in from FilterableProductTable.
如果尝试在当前版本中的例子中输入或勾选复选框,React会忽略所有输入。这是有意为之,input的value属性始终等于从FilterableProductTable中传入的状态。
Let’s think about what we want to happen. We want to make sure that whenever the user changes the form, we update the state to reflect the user input. Since components should only update their own state, FilterableProductTable will pass a callback to SearchBar that will fire whenever the state should be updated. We can use the onChange event on the inputs to be notified of it. And the callback passed by FilterableProductTable will call setState(), and the app will be updated.
想想我们期望程序的表现。我们期望当用户改变表单输入的时候,根据用户输入同步更新状态。由于组件仅能更新自身的状态,FilterableProductTable将传给SearchBar一个回调函数以响应状态的更新。可以在输入框上使用onChange事件接收通知,随后该回调函数将调用setState()方法,应用将完成更新。
Though this sounds complex, it’s really just a few lines of code. And it’s really explicit how your data is flowing throughout the app.
尽管挺起来有些复杂,但真的只需要简单的几行代码即可实现。同时清晰的表达数据在应用中的流动。
就这么简单(And That’s It)
Hopefully, this gives you an idea of how to think about building components and applications with React. While it may be a little more typing than you’re used to, remember that code is read far more than it’s written, and it’s extremely easy to read this modular, explicit code. As you start to build large libraries of components, you’ll appreciate this explicitness and modularity, and with code reuse, your lines of code will start to shrink. :)
非常希望,这篇文章能给你一些使用React构建组件和应用的想法。有可能这种写法会比你通常的写法多几行代码,但切记读代码远远多于写代码,模块化、结构清晰的代码最利于阅读。当创建一个大组件库的时候,你将感激模块化、结构清晰和可以重用的代码,同时你的代码行数会慢慢减少。:)